Thursday, December 26, 2013

Time Off

Hello! Hello! I'm planning to take a few days off from blogging to enjoy some time with my family and friends. Please plan to stop by January 1, 2014. I'll have my Calendar of Events and details on the latest Stampin' Up News! And I already have some AWESOME ideas for new cards/projects.

I also wanted to share with you a pic that melted my heart!


No matter how old they get, Hunter (16 yrs.) and Jadon (13 yrs.) still wanted to frost cookies for "Santa".

When it comes to Christmas I think we are all still kids at heart!

Hope you enjoy...thanks for stopping by!

Carolyn:o)

Wednesday, December 25, 2013

Day 25 - Merry Christmas Everyone!

We want to wish you all a very Merry Christmas and Exciting New Year! I have enjoyed posting Christmas projects for you all. And I hope you were inspired!


The final project came from Amber Geehan. I thought that this would be the perfect project to end my challenge. What an AWESOME Santa!


Day 25
Gift Bow Tie Santa


It was fun and easy to make.

Amber's Instructions:

IMG_1749 
Cut a piece of Whisper White cardstock 3/8" x 3 3/4" and place each end into the #119857 Word Window punch to round the edges.


IMG_1751 
Use the large piece of the bow from the #129977 Gift Bow Die and glue together. Then run the bow thru the Big Shot using the #117335 Perfect Polka Dots Embossing Folder. 
IMG_1752 
Tape bow and ribbon pieces together.

IMG_1753 
Cut a 1" x 4 1/8" piece of #111351 Pink Pirouette cardstock, and use the  #119873 3/4" Circle Punch. Then ink the edges of the nose with #126956 Pink Pirouette.

IMG_1754 
Santa's hat is cut from the #123126 Perfect Pennants Die (the largest triangle which measures 3 1/2" x 4 1/2"). Curl the tip of the hat using a bone folder. Attach the hat and trim. 


The eyes are punched from the #118074 Owl Builder Punch. Accent the eyes with the #105021 uni-ball Signo Gel pen. The pom pom on Santa's hat is punched with the #132967 Starburst Framelit and  #124005 Silver Glimmer paper is used.

My Happy Place

I always get compliments on my craft room...on how clean and organized it is. So I wanted to show you what it looks like after a crafting spree!


Not so pretty...huh? I think it's going to take me all of my Christmas vacation to clean it up! Anyway, I hope you have a wonderful time with your family and friends over the holidays. See you soon!

Hope you enjoy...thanks for stopping by!

Carolyn:o) 

Tuesday, December 24, 2013

Day 24 - It's Christmas Eve!

Have a Holly Jolly Christmas! I hope you are enjoying your family and friends not to mention all the holiday goodies you've made.


Day 24
Holly Jolly Santa


Here is one of my favorite Santas...he's Holly Jolly!

And very simple to make. 


What a great stocking stuffer!


Supplies

·        #100730 Whisper White CS

·        #102482 Real Red CS

·        #111351 Pink Pirouette CS

·        #121045 Basic Black CS

·        #119847 Ornament Punch (retired)

·        #119859 XL Oval Punch

·        #119855 Large Oval Punch

·        #117191 Bird Builder (for moustache) Punch

·        #118074 Owl Builder Punch (eyes)

·        #130917 Baroque Embossing Folder

·        #102023 Dazzling Diamonds

·        #104430 Dimensionals

·        #100425 2-way glue pen

·        Mini Pom Poms local craft store

Even the Naughty 
Deserve Something Nice Tag


Hope you enjoy...thanks for stopping by!

Carolyn:o)

Monday, December 23, 2013

Day 23

Today I wanted to show you a simple and absolutely beautiful card.

Day 23
Peace on Earth Card


The #127925 Snowflake Soiree and #128033 Greetings of the Season stamp sets were used to make this card. To get the shimmering effect you will place the #120805 Multipurpose Adhesive Sheet onto the stamped image and sprinkle #102023 Dazzling Diamonds all over the adhesive. Flip the card over to remove the excess dazzling diamonds and mount on the card. TIP: When placing the adhesive sheet to the stamped image be careful not to touch the adhesive.


Hope you enjoy...thanks for stopping by.

Carolyn:o)

Sunday, December 22, 2013

Day 22

Happy Sunday! I don't know if you all know but I work at Nothing Bundt Cakes and the holiday season is crazy busy for us. My family loves these  cakes...so I wanted to show you all the bundt picks I did for our Christmas Eve desserts!

Day 22
Bundt Cake Pick


This cute topper was made with the #133294 Tags for You bundle set, the #133285 Festive Flurry bundle set and attached to a lollipop stick using glue dots.

Thanks for stopping by...hope you enjoy!

Carolyn:o)

Saturday, December 21, 2013

Day 21

Hello! I came across this super cute idea and had to share it with you. Are these little guys stinkin' cute?  

Day 21
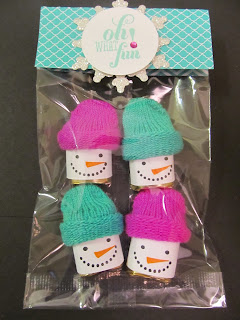
Hershey Nugget Snowmen


This idea came from Linda Bauwin. And they are very simple to make. You will need Hershey Nuggets and inexpensive gloves that can be found at the Dollar Store.

To make these little cuties you will need a strip of Whisper White Cardstock that measures 1" x 3 1/4", #131895 Snow Day stamp set, Jet Black StazOn and Pumpkin Pie stamp pads. For the little hats, you will cut off the entire finger off the kids gloves and roll them up 3 times so that they fit on the nugget. That's it! TIP: Glue dots work best when wrapping the strip around the nugget.


I put four little guys in a #102757 cellophane bag with a topper #130134 DSP Brights paper stack and you have a fun little gift for some one special.

Hope you enjoy...thanks for stopping by!

Carolyn:o)

Friday, December 20, 2013

Day 20 - TGIF!

It's beginning to look a lot like Christmas...everywhere you go! I wrapped a few gifts today and needed some gift card holders for my friends & family. So here is one I did tonight.


Day 20
Gift Card Holder


It was made with our new #133774 Envelope Punch Board, #120902 Northern Flurry Embossing Folder, #131745 Color Me Christmas and #133455 Endless Wishes stamp set (which is no longer available).


Perfect for a gift card or holiday wishes!


Instructions:
(from Dawn Olchefske)
  • Fold 8-1/2" x 5-1/2" card base in half
  • Use Stampin' Trimmer to cut 1/2" off front of card
  • Using Envelope Punch Board
    1. Place open card into the board.
    2. Align left edge of card with the 3" mark .
    3. Punch
    4. Keeping card in the board.
    5. Slide card all the way over to the right.
    6. Align the left edge of the card with left edge of the "opening" of the punch.
    7. Punch
    8. Rotate the card twice (for a total of 180 degrees)
    9. Repeat steps 2-7.
  • Using the Stampin Trimmer, cut away the excess from the "valley" to the end of the card that wasn't punched.  
  • Repeat on the other side.
  • Use the "corner rounder" punch (located on opposite side of the envelope punch), to round the 2 square corners. 
 
Pinterest Project

I wanted to share with you all an idea I saw on Pinterest with Christmas Cards. 

I ran a beautiful red glitter ribbon from the top of my door down to the bottom. Then I used glitter clothespins to attach each card. I had enough cards to do 3 doors.


 It looks fantastic when the light hits it.

Hope you enjoy...thanks for stopping by!


Carolyn:o)


Thursday, December 19, 2013

Day 19

Who doesn't like getting treats for the holiday? It's always a sweet surprise when you get these cute stocking stuffers. Here is another simple and quick one.

Day 19
Ghirardelli Chocolate Holder


The dimensions for this project are 8 3/4" x 3" Whisper White Cardstock. You will need to score on the long side at 1", 5" and 5 3/8". I used the #132340 Season of Style Designer Series Paper and #130012 Chevron Ribbon and #126882 Merry Minis Punch Pack to embellish the treat holder.

Hope you enjoy...thanks for stopping by!

Carolyn:o)

Day 18

Do you believe in the spirit of Christmas? I do...one thing I like to do is pass out little treats to cashiers at the stores, secretaries at the schools, bell ringers etc. It is so nice to see how happy they are to receive these little treats. Following is a very simple treat holder that can be mass produced in a couple of hours.


Day 18
Hershey Kiss Holder


Rats! I missed my post by one minute. I was helping my son with his science fair project and we just finished...Woo Hoo!

Anyway, all you need for this project is a 4 1/4" x 4 1/2" piece of cardstock. Score on the 4 1/4" side at 1 1/4", 2 1/2", 3 3/4".

I used #122512 Sweets for the Sweet stamp set, #119275 Dotted Scallop Ribbon Border, Coastal Cabana cardstock, rhinestones, ribbon and of course 5 Hershey Kisses.
(I run adhesive on the cs to attach the kisses.)

Hope you enjoy...thanks for stopping by!


Carolyn:o)

Tuesday, December 17, 2013

Day 17

Can you believe that there are only 8 days till Christmas? Boy, the time sure has passed! That means only 8 more projects left for my challenge.


Day 17
Joyful Tidings Card


Dressing up a card with washi tape is fun and easy. 
The #131745 Color Me Christmas and #131793 Christmas Messages stamps were used to make this Holiday card.


Hope you enjoy...thanks for stopping by!


Carolyn:o)

Monday, December 16, 2013

Day 16

Hey There! Just a quick post today. I have been out car shopping and it's been exhausting and exciting at the same time. So many choices!

Day 16
Santa Uncensored Card


Just a little chuckle for you all...if you look closely Santa forgot his pants. Luckily, I had my real red marker in hand and put his pants on.


The #131745 Color Me Christmas and #131793 Christmas Messages stamps were used to make this Holiday card.

Hope you enjoy...thanks for stopping by!

Carolyn:o)


Sunday, December 15, 2013

Day 15

Happy Sunday! I am so excited to show you the Holiday Workshop projects. One of my favorite things to do for Christmas is dress up packages/gift card holders and make tags.

Day 15
Tags & Gift Box


This fantastic idea was CASED from Erica Cerwin. The #133285 Festive Flurry Bundle and #131793 Christmas Messages stamp set was used to create these beautiful snowflakes! For the bottom layer I used white embossing powder on real red cs. The next layer was the snowflake image stamped with real red ink onto whisper white cs. Then a smaller snowflake #124005 Silver Glimmer was placed on the top of the other two layers. And topped off with "Oh what Fun!". This project is so versatile it can be used as a tag or an ornament.

These cute milk bottles can be found at Wal-mart.

Next was this gift box...


What a pretty package! The inspiration came from Natasha Yandbergen. It was made using #130927 Tag a Bag Gift Boxes (8 to a package), #129977 Gift Bow Die, #132340 Season of Style DSP, #132148 Old Olive Simply Styled Embellishments and #129983 Chalk Talk Framelit.

I have to tell you that I really love the Gift Bow Die. It is so simple and easy to assemble. I know this is going to be one of my favorites! Tip: Use a bone folder to curl the cardstock before assembling the bow.

This packaging idea can be used throughout the year by changing out the colors of the designer papers. 


Here is the tag once again up close and personal.


And finally Santa Owl!
(project 15) 


What a cutie! The #118074 Owl Punch was used to make this gift card holder. I attached it to a clothespin and placed it at the top of a card. Tip: Patience is required in order to attach all the pieces:o).
 

Hope you enjoy...thanks for stopping by!

Carolyn:o)

Saturday, December 14, 2013

Day 14

I have another sneak peek to share with you today...Woo Hoo! (I'm liking this sneak peek thing.) And with Christmas right around the corner these projects will definitely come in handy. We used lots of Stampin' Up goodies from the Holiday Catalog. 

Day 14
Sneak Peek


Hope you enjoy...thanks for stopping by!


Carolyn:o)