Monday, April 28, 2014

SU Premiere Tonight

Hello, Hello! I have some exciting news to share with you today. Stampin' Up Demonstrators will be attending a Premiere tonight to see our upcoming 2014-2015 Catalog. Woo! Hoo!

Anytime demonstrators get together we have a swap. So following is my swap for tonight!

2014 Stampin' Up Premiere Swap


I think the black boxes are my favorite.

I like to use different colors because each color gives your creation a different look!


I was surprised by the yellow...they are my second favorite.


So have fun with your projects. 
Here I experimented with the colors of the embellishments.


I ended up making 24 boxes for my swap.


Assembling the Treat Boxes

If you've never done a large number of cards/treat boxes before, 
the easiest way is to do it is in STEPS. 


First, cut and score the amount you have decided to make.


Next, assemble them. Use your bone folder on score lines to create sharp crisp edges. TIP: This will take some time so when you get tired, take a break...I usually take a CHOCOLATE break.


When making treat boxes or any type of box always use your 
tacky tape (red line) or tombo glue. These are the best adhesives 
to hold your boxes together.


Finally, the best part...embellish! If you like color use it. 
You never know how something is going to turn out:o).

All packed up and ready to go!

Stay tuned for the directions to the template...


Hope you enjoy...thanks for stopping by!

Carolyn:o)

Friday, April 25, 2014

Sweetie Pie Stamps

Just a little reminder that FREE shipping ends today! 

Wow! I can't believe it's already Friday. I've been under the weather so I've lost track of time. But I have a super cute card to show you today! This is from the New #136849 Sweetie Pie Photopolymer Stamp Sets and #137121 Sweetie Pie Frames which can see and be ordered Here.


Sweetie Pie Card


Also used in this card is the #132187 Arrows Textured Embossing Folder with the #131059 A Dozen Thoughts stamp set. Which is a great stamp to have...lots of different sayings.
 Hope you enjoy...thanks for stopping by!

Carolyn:o)

Wednesday, April 23, 2014

Lori's Easter Treat

Hello! I wanted to post what one of my "Soul Sisters" made me for Easter. It is so stinkin' cute.


Lori's Easter Treat


Lori made this cute basket with a 12 x 12 sheet of cardstock and used the #133071 Eggstra Spectacular stamp set. To embellish the egg she used the #133322 Petite Petals punch, #118309 Itty Bitty Shapes punch and #117191 Bird Builder punch. And to make the Easter Rabbits treats she used colored Wilton Candy Melts...YUM!!! 

U Rock Lori!

Hope you enjoy...thanks for stopping by!

Carolyn:o)

Tuesday, April 22, 2014

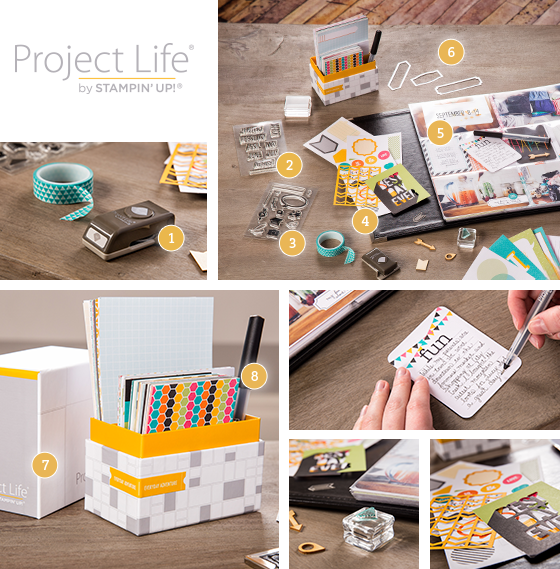
Stampin Up & Project Life Together

Happy Tuesday! I am so excited to let you know that Stampin' Up has partnered with the talented Becky Higgins to bring you the Project Life products...Woo Hoo! 


We will have exclusive Stampin’ Up! colors and designs. If you’ve somehow missed the Project Life craze and are wondering what it’s all about, let me tell you. It’s a simple and fast way to get your photos into albums. You just slip your photos into Photo Pocket Pages and add designed cards. It’s that easy!


Here is a little sneak peek of what’s going to be available Thursday, May 1.

blogimage2_projectlife_april1514_all

Hope you enjoy...thanks for stopping by!

Carolyn:o)

Monday, April 21, 2014

Easter Monday

Good Morning! The boys are off to school and I wanted to post one more project I made for Easter.

Money Boxes


Check out these cute boxes the boys got in their baskets. 
I used my Silhouette to create these fun treats!


Hope you enjoy...thanks for stopping by!

Carolyn and Zoe :o)

Sunday, April 20, 2014

Happy Easter!

HaPpY eAsTeR!

I hope you all are enjoying your day with your friends and family! I have just a few reminders for you all...but first just a few more projects for you!

The Easter bunny was very busy last night making some cards and specials treats for Chuck and the boys.


My Men (Hunter, Chuck and Jadon)


Easter Tri-Fold Card


I created this card for Chuck and attached a gift card inside with a glue dot. The stamps used are now retired or given to me as a gift.

This was card was easy and fun to make. Following are the instructions...
  • Take a 4 1/4" x 11" piece of cardstock and score at 4 1/4 and 8 1/2 inches on the 11 inch side of the paper using your #122334 Simply Scoring Tool.
  • Take your #120906 2 1/2" circle punch and line it up as shown on the score mark you made at the 8 1/2 inch mark. Slide the punch all the way in making sure that the score line is in the middle of the circle. Punch out the circle and discard.
  • Punch out a 2 inch circle from cardstock. I used crumb cake and attached it to the card. (When attaching keep the card closed so that you will be able to open and close the card correctly). Now the card is ready to be embellished...woo hoo...my favorite part! Punch out a #118874 2 3/8" Scallop Circle from any colored card stock. I used white and a dimensional to attach it to the 2" circle. Next punch out edge of cardstock with your choice of border punch. I used the #119882 Scallop Edge Border. Add some Bakers twine to the top of the flap.


Here is the inside of the card. 


Carrots Treats
I saw these cute little carrots all over Pinterest and thought they would be perfect for my bunny box!


To make these you will need #118874 2 3/8" Scallop Circle, a 1 1/2" by 2" piece of gumball green cardstock, embossing folder and #133325 fringe scissors.


First, I gently rolled the cardstock with my finger so it would take shape. Then I added a strip of adhesive and attached the pieces together. Next I used the tacky tape at the end of the carrot to hold it in place and added the Hershey's egg on the top.


 Ta-da! Here it is in my bunny box...super cute!


Here is Mr. Bunny carrying his load of goodies! You can find the instruction for him here.


REMINDERS
 
FREE SHIPPING On EVERYTHING!

FREE Ship
Get your list together because Stampin' Up! is having FREE SHIPPING on everything from Monday, April 21 through Friday, April 25. Don't miss this rare opportunity for FREE SHIPPING!

You can check out my Online Store to find your products. You will be able to take advantage of the FREE Shipping through Online ordering or I will be happy to help you out!


Catalog

It is hard to believe, but the retirement list will be coming out on Monday, April 21st so it’s time for you to buy the stamp sets you just can’t live without! ***Retiring Stamps this year are limited to supplies on hand.***


click here.

Hope you enjoy...thanks for stopping by!

Carolyn:o)

Friday, April 18, 2014

Petite Petal Bundle

Good Afternoon! I wanted to show a very simple and beautiful card that Becky Roberts created. It took me minutes to create and duplicate it. I used a sympathy saying but any greeting would work.

Petite Petal Card


These cards were made using the #134822 Petite Petal Bundle, #130517 Gorgeous Grunge, #133485 Best of Greetings, #126747 Stippled Blossoms stamp set and #122941 mini brads.


Hope you enjoy...thanks for stopping by!

Carolyn:o)

Thursday, April 17, 2014

Oh Snap!

 A Sneak Peek!


Oh Snap! I forgot to post this super cute idea I cased from Mercedes Weber. It has been such a crazy week, I am glad it is coming to an end. So excited to spend some time with my family for Easter:o).


The girls had a blast making this stinkin' cute card at Stamp Club Friday night!

You will need these punches to make your crab #119859 Extra-Large Oval, #120908 Small Oval, #119857 Word Window, #130919 Hexagon, #119860 1" Circle and #118309 Itty Bitty Shapes Punch Pack (Circle).

To make the claw punch the Word Window then center the 1" Circle over it and punch for the claws. The legs were created by punching the Hexagon and then putting the paper back in and punching around the outline again.

I also used the #132995 Kaleidoscope DSP, #132968 Word Bubble Framelits, #133504 Hip Notes stamp set and cheese cloth for the net. TIP: You can find this at Wal-mart in the sewing section.

Hope you enjoy...thanks for stopping by!

Carolyn:o)


Monday, April 14, 2014

Bunny Basket

Today, I have an AWESOME project that you will be able to use as you celebrate the Easter season. I found this idea on Pinterest and have been waiting to make it...so here it is.


Bunny Basket
 

Isn't he cute?


So is his backside.

Here is a list of the parts you’ll need:

Cardstock: Crumbcake and Strawberry Slush
Body: Ovals Collection Framelits Dies (use the fourth from the smallest)
Hands: Ovals Collection Framelits Dies (smallest oval cut in half)
Feet: Ovals Collection Framelits Dies (smallest oval cut in half)
Ears: Ovals Collection Framelits Dies (smallest oval), Large Oval Punch
Nose: Small Heart Punch
Eyes: Pearls
Whiskers: Whisper White Baker’s Twine
Egg: Small Oval Punch, Bitty Banners Framelits Die (banner)
Tail: Owl Punch (heart), BoHo Punch
Basket: Petite Purse Bigz L Die

I started with one but you know how bunny's are...they multiple.


Hope you enjoy...thanks for stopping by!

Carolyn:o)

Friday, April 4, 2014

Fun Day Friday!

Good Morning! I love Fridays because that is my "Fun Day." Sometimes I grab lunch with friends and craft or just hang out in my jammies all day. I have a fun card for you today with lots of color!


See Ya Later Birthday Card


This card was made with #132969 On Film Framelits,  
#132995 Kaleidoscope DSP and See Ya Later (SAB) stamp set.

Hope you enjoy...thanks for stopping by!

Carolyn:o)

Wednesday, April 2, 2014

Happy Hump Day!

Hello! Sorry my post is a little late...but worth it. Today I went over to my friend Cathy's house and she showed me how to make this beautiful cross for my front door. It is gorgeous...thanks Cathy!


Cross


This cross measures 19 3/4" x 30".

To make this project you will need a black foam board, 2 sheets of moss (greenery section of your local craft store), ribbon, one Lily, exacto knife and glue sticks/gun. 

First draw your cross on the black foam board and then cut out with an exacto knife. Be sure to cut completely thru the foam board. Now lay a sheet of moss out and trace around the cross leaving a 1/2" to fold around the cross. 


Then using the glue gun put the glue around the edges of the cross. Do this in small sections as you go around the cross. Please be careful when gluing...it is very hot. Use a pencil or screw driver to hold down the moss as it dries. Next, tie the ribbon around the cross. Add the Lily up above the bow. 


What a beautiful Lily!


A hole was cut to feed the Lily thru the back of the cross and covered so it would not scratch anything from the back.


Hope you enjoy...thanks for stopping by!

Carolyn:o)